Showing posts with label Dessert. Show all posts

Thursday, December 14, 2017

Maple Bacon Fudge

Wow, this is the first blog post in about a year and a half. Time flies. I felt this was a good one to put out there since it's received such good feedback so far.

Christmas time means fudge, lots and lots of fudge. I make many pounds of fudge every year for friends, family, and work. I was given a very good base recipe many years ago and it has never failed me. Its time consuming but it turns out perfect every time. The cooking is exactly the same for each flavor of fudge the variations are the flavor of chips you use and any nuts or mix-in's that you might want (booze, bacon, dried fruits).  

Here is the base recipe


2 Sticks Unsalted Butter (room temp)
2 Cans Sweetened Condensed Milk (room temp) 2 Cups Light Brown Sugar 2 Tablespoons Light Corn Syrup 1 Bag (11.5 oz) White Chocolate Chips
Pinch Of Salt

For the Maple Bacon Fudge you will also need:

6-8 strips of Maple Cured Bacon
3 Tablespoons Pure Maple Syrup (Not pancake syrup)


Here's how you make the fudge:

Prepare your dish to cool and shape the fudge. Don’t use anything bigger than 7x12 or your fudge will be really thin unless you double the batch and that will increase the time it takes for the initial boil. Whatever you use, line it with plastic wrap.. Not wax paper. I tried wax paper several times and it stuck every single time. Cook the bacon until just crisp. I always cook my bacon on a rack in a sheet pan lined with foil for easy clean up. Using the oven I feel cooks more evenly and is way less mess than frying in a skillet. Cook at 400 degrees until it gets to where you like it. For the fudge you want it almost crispy. It will continue to cook when you pull it from the oven so "almost crispy" will turn out just right.  Drain and pat with paper towel too get as much grease off as you can. Set aside to cool. Once its cook chop into small pieces. Like bacon bits only a little bigger.
Next, in a heavy, medium size sauce pan add the butter, condensed milk, corn syrup, brown sugar, salt and 2 tablespoons of the maple syrup.
Turn the heat on to medium high. 
Whisk the mixture constantly, scraping the sides and corners, until it comes to a full boil. Takes about 10 minutes depending on your pot. Once it comes to a boil turn the heat down to low and continue whisking over low heat for 10 minutes. Set a timer and don’t guess. Its important.
After 10 minutes take it off the heat and let it sit for 2 minutes. Again, set a timer. 
Once the 2 minutes are up pour in the chips and mix with a big spoon until the chocolate is all melted and the mixture is smooth.
Mix in the remaining maple syrup.
Mix in the chopped bacon a handful at a time. Save about 2 tablespoons to sprinkle on top. Pour the fudge into your prepared dish and scrape out as much as you can. Sprinkle the remaining bacon on top and refrigerate for at least 2 hours before cutting.

Use the longest knife you have and cut 1-1.5 inch wide strips along the entire length. Cutting across the shortest length first is easiest. Then take about 3-4 of those strips and cut the pieces as big as you want. This is very rich so I'd suggest smaller portions. You can get really fancy and trim off the rounded rough edges so that all your pieces are square but that kind of takes away from the homemade look.


Tuesday, October 11, 2011

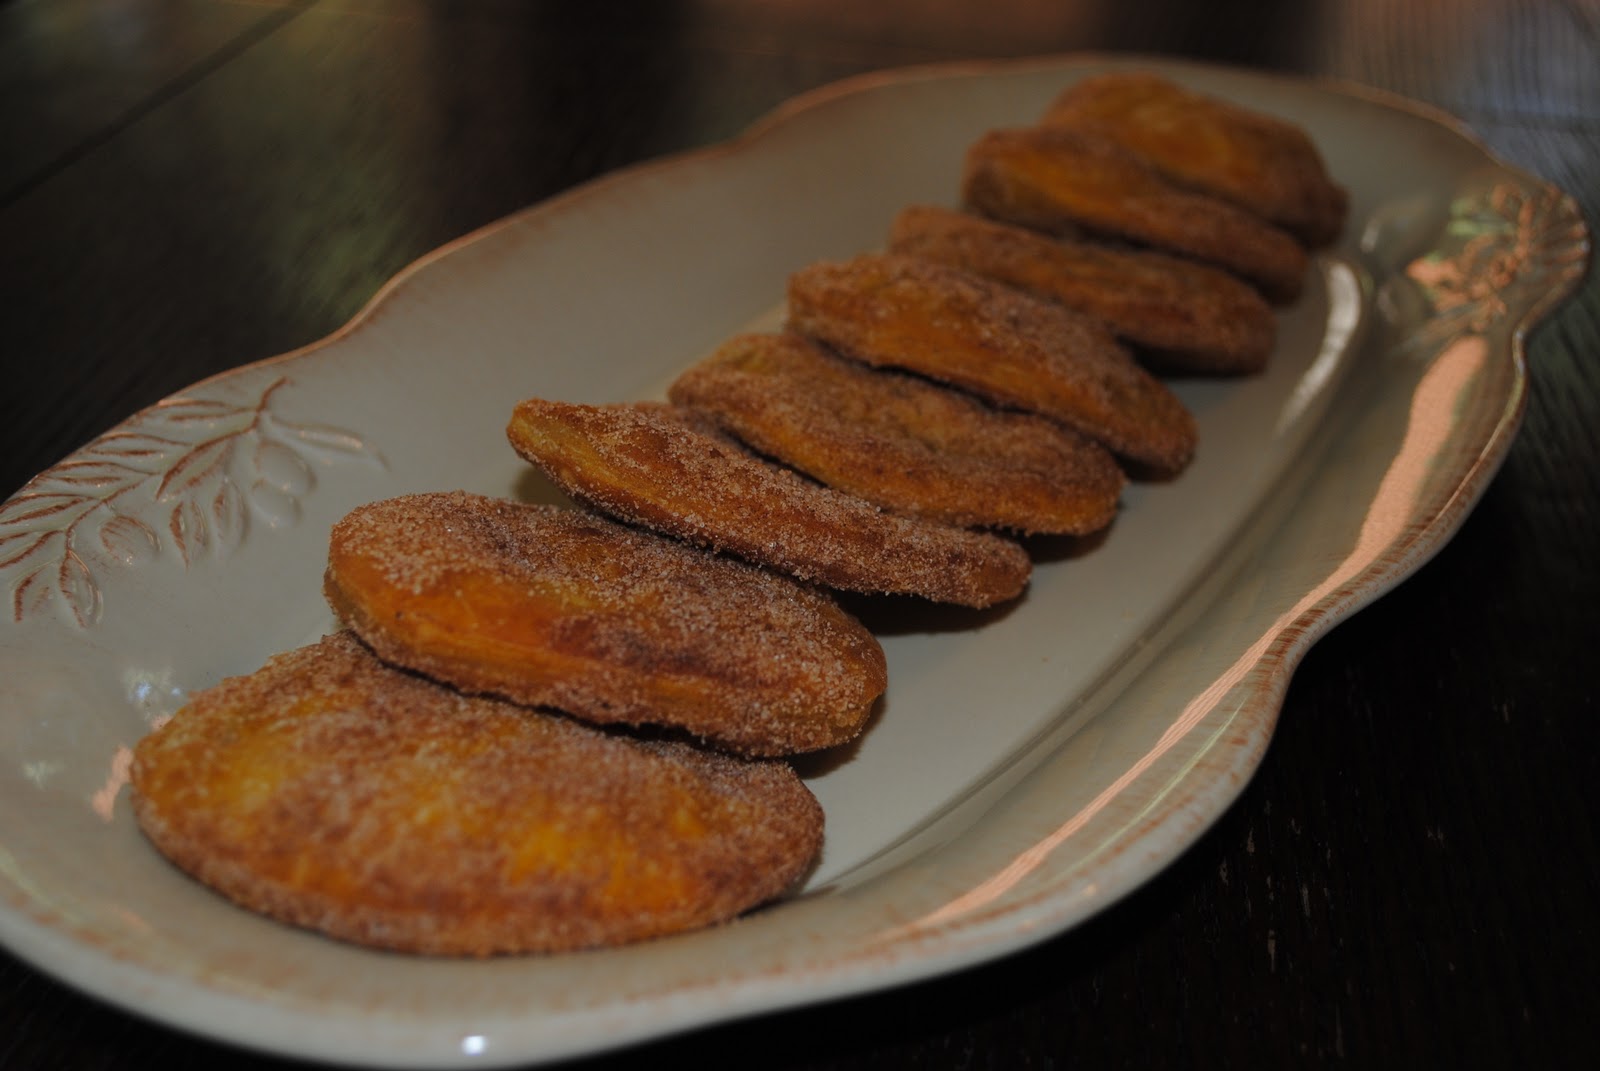
Pumpkin Sopapillas


Like most people my age around North Texas, I was introduced to sopapillas by local Tex-Mex/Mexican restaurants. Pancho's to be specific. A lot of people look down on Pancho's because its a buffet style place and its cheap. Flautas, Tacos, Enchiladas, Chile Rellenos...all you can eat. When my friends and I would go back in our high school days it was about $4 or $5 plus your drink. Most of us played football and/or basketball so we were always hungry so Pancho's was the ideal spot to fill up. The food was, and at some locations still is, very good. They serve so much that everything is usually fresh and piping hot.  But the buffet line food wasn't what we were really there for.  We could eat until we would burst but we always had room for the sopapillas.  These little puffed squares of pastry were light, airy and slightly sweet. Everyone had their own style of eating them but the one common thing for us was honey, and lots of it.   Tear off a corner and fill it, poke the top of the squeeze bottle into one of the bubbled up pastry layers, or drizzle it over the top....always a treat.

Sopapillas are basically fried dough. Not much to them really but sometimes its the simplest things that are the best.   They come from Mexico & South America. As with most foods each culture and region has its own version. The ones we had at Pancho's were of the New Mexico/Texas/Mexico variety. As you move farther south the recipe and ingredients change as well as the usage. Some are savory and used like a bread or tortilla and topped or stuffed with meats and vegetables.  Others are sweet and eaten as a treat or on special occasions.  The recipes I chose to work with were for a Chilean style sopapilla which is eaten in the late morning or early afternoon as kind of a "pick me up". Its loaded with fiber and carbs to help get you through the day. It is basically a fried savory pumpkin quick bread. The most basic of ingredients are used and you can eat this as is or add some sugar or spices to really transform it into something completely different. If you try this recipe I urge you to try a couple without the "Pumpkin Pie Dust". The flavor is great and they will fill you up.

Be sure to get your oil temperature up to 375(F) before frying.

Ingredients

Dough
3 cups all purpose flour
1 tsp baking powder
1 tsp salt
8 oz canned or fresh pureed pumpkin(butternut squash or sweet potatoes can be substituted)
 1/2 cup lard, shortening or margarine - melted (I use shortening)
Vegetable oil for frying

Pumpkin Pie Dust
2 tbsp granulated sugar
1 tbsp ground cinnamon
1/4 tsp ground clove
1/4 tsp ground ginger


Method

In a mixing bowl combine 2 cups of flour with the baking soda and salt. Mix to incorporate.  Add in the pumpkin and mix by hand, adding the melted shortening until it forms a dough. Work it to distribute the moisture but don't over work it.

On a floured surface roll out the dough to about 1/8 inch thickness.  Using a 3 inch round cookie/pastry cutter cut out as many circles as you can.  Keep the trimmings.

Fry the cut outs 4 at a time letting each side turn golden brown before flipping. These don't take very long to cook.  Flip, brown the second side then remove from the oil and drain on a rack or a paper towel.

In a small bowl mix together the Pumpkin Pie Dust ingredients.  Roll each sopapilla in the dust and set aside.

Ready to serve.

Makes about 12-16 Sopapillas.

Monday, October 25, 2010

Red Velvet Cake


I don't remember where we got this recipe but we've been making it for a long time now.  I know we've tweaked it a bit over time to get the results we wanted.  After trial and error with several (failed) recipes this one came along and was exactly what we were wanting. A dense, moist cake with a deep red color and that tasted like Red Velvet should taste.

It seems that you can pass off any red colored pastry or cake as Red Velvet these days.  Just whip up a chocolate cake and dump in some red food coloring and voila! Red Velvet this or that.  Not so fast...  Red Velvet is not a chocolate cake or cookie. There is very little cocoa in fact.  What sets it apart is buttermilk and vinegar.  Each of these gives the cake a taste and aroma that is a little different but very appealing, or is that addicting?

Frosting for Red Velvet usually one of two choices...Butter Cream or Cream Cheese.  Honestly, I prefer the butter cream on this cake. I'm not that fond of the cream cheese flavor mixed with the buttermilk/vinegar flavor.  I feel that you need the sweetness of the butter cream to balance it all out. But to each his own. Feel free to explore other options as well. It's only food and if you don't like the results, start over.

Ingredients

2-1/4 cups all-purpose flour
1 teaspoon salt
2 tablespoons cocoa powder
1 large bottle Adams Red Food Coloring (1.5oz)
1/2 cup Crisco
1-1/2 cups sugar
2 large eggs
1 cup buttermilk
1 teaspoon vanilla extract
1 teaspoon white vinegar
1 teaspoon baking soda

Method

Preheat oven to 350°F. Grease and flour two 9-inch cake pans.

Combine the flour and salt.

In a small bowl, mix the cocoa and food coloring together until smooth.

Cream together the shortening and sugar until fluffy. You should cream this for at least 5 minutes.
Add the eggs one at a time, making sure each one is incorporated before adding the next.

Add the flour to the creamed sugar & eggs alternately with the buttermilk and vanilla, scraping
down the sides of the bowl as you go. Add the cocoa/food coloring mixture, mixing until color
of batter is uniform. Do not over beat or else the cake will be tough.

In a small bowl, mix the vinegar with the baking soda and add it to the cake batter. Fold it in
to incorporate well but do not beat.

Pour the batter into the cake pans.

Bake in a 350°F oven for 18-20 minutes or until a cake tester comes out clean.

Let the cakes cool for 15 minutes then cover the pans with plastic wrap and allow
them to cool 30 more minutes on a rack before turning out. This step has shown to produce
a much more moist cake.

Let cakes cool completely before frosting.


***  Substitute vegetable oil for the Shortening in the cake batter for a more moist cake.

Thursday, September 30, 2010

Mema's Peanut Butter Fingers


For those of you NOT from the Southern United States, a "Mema" (pronounced "Mee-Maw") is your grandmother.  Just like granny, nana, etc...  With that said, Mema was probably the nicest person you would have ever known. I can't remember her ever raising her voice to any of us grand kids.  She also taught us many things whenever we would stay with her. We learned how to shuck peas, shuck corn, sew, macrame and all other sorts of things.  Her food was very rustic and simple but it was always good. This particular recipe was a hit with everyone.  The peanut butter fingers always seemed to disappear as soon as she put it out. She made these for as long as I can remember and from what I understand, many years before that.  I have no idea where the recipe came from originally but its been a family tradition for holidays for a very long time.

Be careful not to over bake these or they will be hard as a rock.  Also, don't use crunchy peanut butter in the dough. you won't like the results.  Crunchy in the frosting is pretty good though.  I have added chocolate chips to the mix and it came out pretty good but the original, basic recipe is still the best.  I will add pictures the next time I make these.

Ingredients

1 cup shortening (don't substitute anything else)
1 cup sugar
1 cup brown sugar
2 eggs
½ cup + 2 tablespoons peanut butter
1 teaspoon soda
½ teaspoon salt
1 teaspoon vanilla
2 cups flour
2 cups oats (like Quaker Oats)


Method

Preheat oven to 350
Cream together shortening, sugar and brown sugar.
Add eggs 1 at a time then the peanut butter, soda salt and vanilla and mix until incorporated.
Stir in flour and oats.
Bake in greased 9x13 pan at 350 degrees for 20-30 minutes or until the top barely starts to brown.
Top with Frosting (see below), cut into squares.


Frosting Ingredients

1 cup powdered sugar
½ cup peanut butter
¼ milk, room temperature

Frosting Method

Whisk all ingredients together until smooth

Monday, September 20, 2010

Banana Bread with Rum Glaze


Who doesn't like banana bread? A nice warm slice with a little butter on top is hard to beat. The base of this recipe is from a Betty Crocker cookbook from the 70's but I changed up a few quantities and added some rum so I can't take full credit for it. But, follow my instructions at the end and you'll have a moist, rich banana bread every time.


Ingredients

1 cup sugar
1/3 cup unsalted butter, softened
4 medium ripe bananas
2 eggs
1/4 cup water
1 tablespoon of dark rum
1 2/3 cup all purpose flower
2 tsp salt
1/4 teaspoon baking powder
1 teaspoon baking soda
1/2 cup chopped pecans
1/2 cup chocolate chips (Optional)
1 cup of Rum Glaze (click for recipe)

Method

Preheat oven to 350 degrees.
Grease the bottom of an 8inch loaf pan.
Mix together sugar and butter.
Add eggs 1 at a time, mix until incorporated.
Add bananas, water and rum. Beat until blended
Add remaining ingredients except pecans and chocolate chips, stir until moist.
Fold in pecans (and chocolate chips if using)
Turn the batter into the prepared loaf pan and bake for 60-75 minutes
or until a knife inserted into the dead center comes out clean.
while still hot and in the pan, use a skewer to poke holes in in the loaf.  Pour
1/4 cup at a time of the rum glaze over the loaf. Let each 1/4 cup soak in before
adding the next.

Let cool for 10 minutes, use a knife to loosen the sides and remove
from the pan. Immediately wrap in plastic wrap and let sit for at least 2 hours,
overnight if possible.  Remove plastic wrap and slice.

To heat, toast it in a skillet on both sides, under a broiler or wrap in a moist
paper towel and microwave for 20 seconds or so.